Convert HEIC to PNG or JPG on MacBook
- Achyuth L

- Dec 6, 2023
- 2 min read
Updated: Feb 6, 2024
Today I will show you how you can convert HEIC format pictures to JPG or PNG pictures, natively on the Macbook without the internet or any third-party software. This is Mr ASquare Tech. Let's get started.
No Internet or External Software is required to convert file from HEIC to JPG format.
Watch the video tutorial of Converting Heic file to JPG or PNG here:
Convert single file from heic to jpg:
First, open the folder where you have the HEIC format pictures.

As you can see this is a picture in heic format. Now, to convert it, right-click on the file and click on ‘Open with Preview’ app. You will have this 'Preview' app by default in your MacBook so no worries.
The image will be opened in the Preview app, now click on File menu and click on ‘Export’.
A new dialog will open with several options.
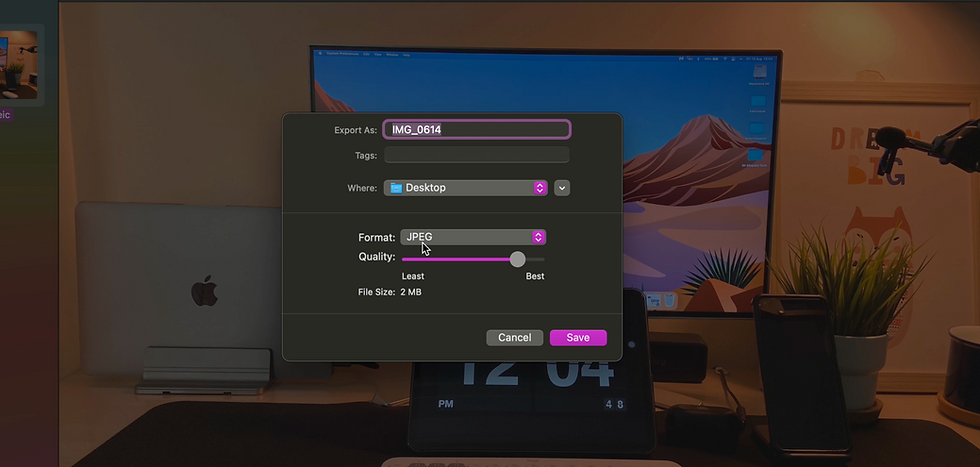
You can rename the file with 'Export As' option.
You can select where you want to save the new file here. I selected desktop.
Now the magic happens at 'Format' option. Select the Format dropdown.
You can convert this HEIC picture into JPEG, PNG, PDF or any other format. I’m selecting JPEG.
You can alter the Quality. You can downgrade or upgrade the quality and get a lower size or higher size file based on the requirement.
Click on 'Save' to export the file.
Let me show you the folder where the file is exported. I moved it from desktop to the folder.

As you can see the file is indeed JPEG. Wonderful.
If you think this is hard to do while reading and doing, go checkout the Video Tutorial of Converting HEIC to JPG or PNG where I clearly explained each and every step with live demo.
Convert Multiple Files from HEIC to JPG(bulk conversion):
Now let’s say you want to convert a bunch of pictures. Say 100 or more. You can’t do it one by one right? So let me show you the easiest way.
Select all the pictures you want to convert to jpg and click on open with 'Preview' app.
Pictures will be opened in 'Preview' app. Now select the files by clicking 'command + keyboard letter A'. This will select ALL the image files opened in the 'Preview' app.
Goto File menu. Now click on ‘Export selected images’.
A dialog will be opened.
This is destination of new files, Click here on ‘Show Options’.

Select the format just like earlier. I am selecting JPEG.
Select the Quality as per your choice.
Finally, Click on 'Choose' and the export starts.
All the exported files will be of format JPEG.
That’s it. Hope you learned something today. Don’t just learn, share it with your friends who needs this. If you have any questions ping me on Instagram @mrasquaretech or leave a comment for this post. If you enjoyed this tutorial, please like share comment, become a follower for the latest updates on tech and check out my youtube channel -Mr ASquare Tech for more such useful reviews. Please let me know if you have any questions. Thank you for staying, see you in another post with the tech you love.
Comments